Monday 5 May 2014

RUST Final Major Project ~Conclusion

Sprocket: Probably my favorite of the robots, due to him being my first, and I spent a lot of effort and detail into getting him exactly right (especially all that intricate leg work) I found that the amount of trial and error I spent on him really helped in the process of the later robots, as through feedback I got off people by showing them Sprocket, led me to learn processes such as: Ambient Occlusion texture baking, combining Glossy and specular maps and getting fantastic results with lighting because of that, playing around with normal's and applying glow maps were all things that I learnt about and added to my knowledge of the character creation process. 
Also, with a focus on hard-surface characters for my project, I learnt about the importance of structure and engineering and how that applied to modelling, and making things look believable with the use of rightly applied smoothing groups and also clever use of instancing, but not to the degree where it becomes obvious. With Sprocket, I would have loved to have work on his animations so that he interacted with his props, such as taking out his pipe or swinging his arc-welder tool around! Originally planned to change the in-engine player to Sprocket's mesh also, but obvious time constraints prevented this. 

Leo.... Probably the character I made that I had the least problems with in the creation progress, and who I have a soft spot for because of his gentle giant persona....... I'm quite proud with how his personality has been able to make the transition from sketch to 3D, as I was able to not have to make any allowances or changes to my original idea. With Leo, I was really able to fine tune my texture creation process, whereas before I had struggled with getting specular's looking right no matter how many times I went back to the drawing board.... and by no means are they perfect, but I think considering what my skills were like at the beginning of the project with such things, I think working through it on Leo has definitely helped me a lot, and I think it shows on the quality of his surface material. Leo also helped me expand on my knowledge of the CATRig method of rigging bones to my characters, as I had brushed on it first time with Sprocket, but it was due to Leo's more unique body shape that I came to grips with adapting the rig method to suit my needs. I also think the inclusion of his own teddy bear sat atop his shoulder was a nice touch, that I think works really well (other than the fact that it would most likely fall off.... but just go with it).

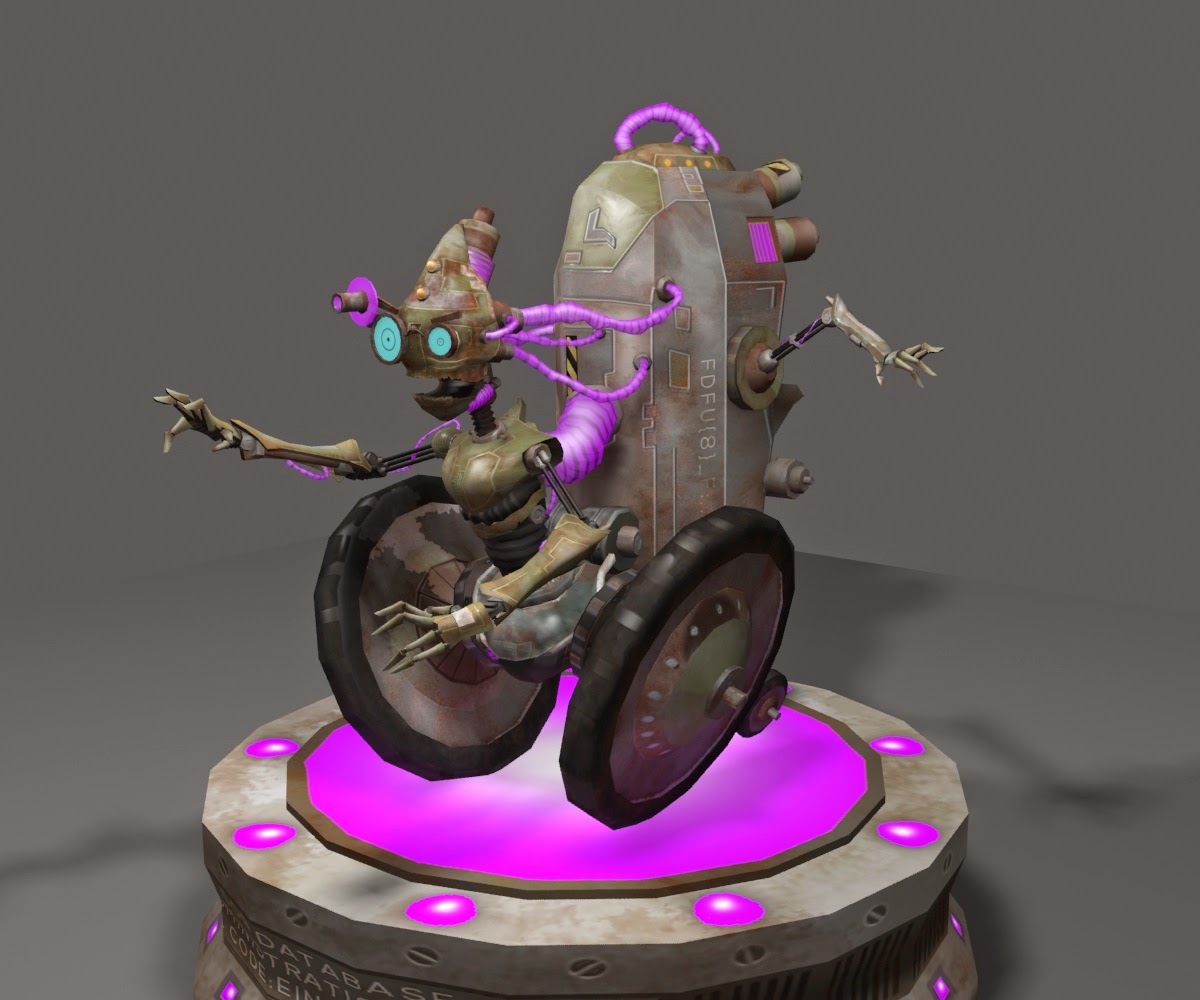
Hmmmm, Steinton...... the character that gave me the most grief in terms of his creation progress. I should have known that creating a character that wasn't a straight forward biped would lead to difficulties, but my persistence  in making a wider variety of robot types stuck through until it was actually too late. Nevertheless, I think that by sticking with it, I was able to solve (or at least learn new things) new problems in the process. The most obvious issue I had with Steinton was because of him having wheels it meant that he couldn't be rigged the normal way, or at least make his wheels apart of his rig.... I had to animate those separately. And just the fact that the wheels were tilted to be more unique, meant that they HAD to be separate meshes (If I had made them attached and wanted to rotate them, I would have literally had to make the wheels a 90 degree angle losing their jauntiness for it to work... something I think took too much personality out of the character), which led to me looking up hierarchy systems and making the wheels child element's to the rest of the mesh and rig, until it finally all worked... no more leaving his wheels behind, all spinning aimlessly on their own. One thing that probably still bugs me about Steinton, is his colour scheme..... in a way it was meant to be more drab and boring to show his origins as a boring data sorting droid.... But I would have liked more time to try out a bigger variety of surface styles and colours, as I think it lacks something that makes it 'pop' (even with ambient occlusion added).
Timescale wise, regardless of running out of time to do several things that I wanted (animating characters in engine, more scene props, creating idle animations for each character, etc), I think I did especially well to not only concept, and model three characters that I had planned out to do, but also fully rig them all with walk cycles and get them into a full scene in engine, something that a few weeks ago I thought I would have no time to do... and was in fact recommended that I maybe consider doing only two characters, so that I could spend more time polishing them up and working on my scene. I'm glad I stuck to my guns though, and regardless  of the constant work and obstacles, I managed to overcome most of them to come out with an end result I'm really proud of. 
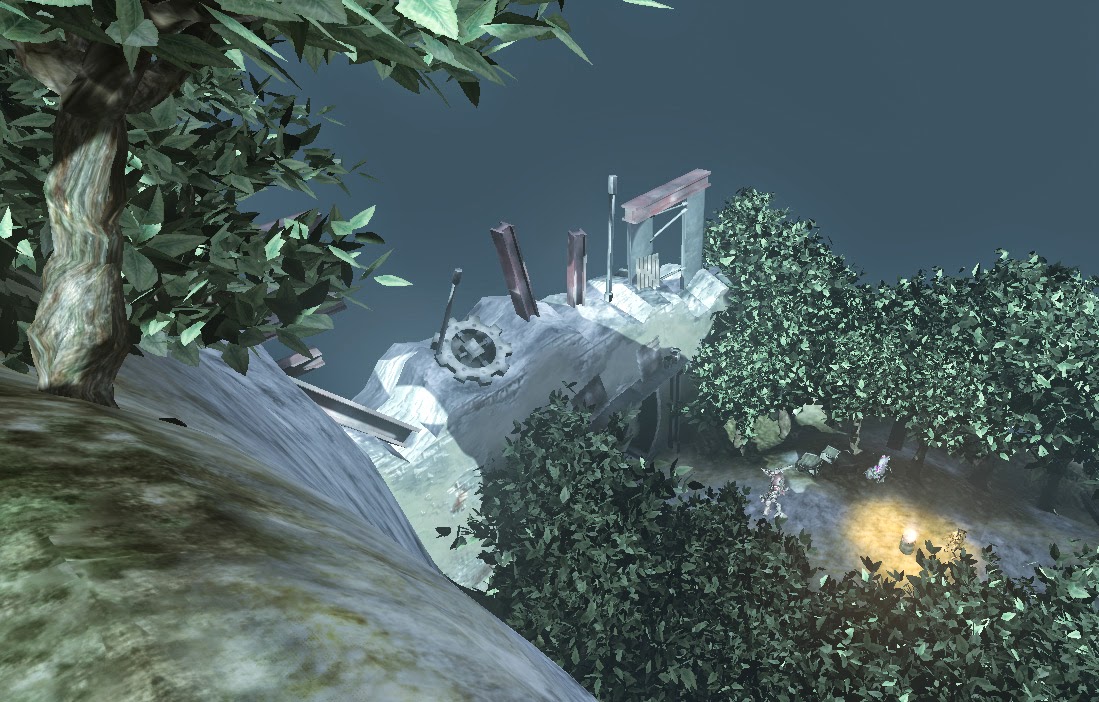
Creating a particle system for my fire was another extra thing that wasn't really part of my original brief, but that I put time aside for to create that extra bit of atmosphere and to really set the scene with my characters. It adds a drawing point to the scene that brings your eyes inwards, towards the gathering point of the three droids. 
Another issue that still annoys me regardless for having no time to resolve it now: The bloody light maps only working for Sprocket. Would have loved to sort out both Leo's and Steinton's as it works really well in reflecting the warm glow of the fire light. But never-mind, at least it managed to work for at least one of my characters, and is a process I have learned now with the creation of physic-assets. 

The end result of this project, is hard to talk about at this stage. Exhausted and sleep deprived, I feel like I've just had enough of it at this point. However, If i try to separate my thoughts on it away from my current mental state, I think it is definitely a great representation of my culmination of work here at Dmu.... Looking at all my characters in engine, it's hard to decipher that It is something made by someone who struggled to model a wheelie bin, never mind fully rig characters into an entire scene in engine, but I guess it is evidence of the amount I have learned in what feels to me a very short amount of time. 
I think I have achieved pretty much everything I initially set out to do with this project, and I'm glad that I persevered with making sure my original characters retained their appearance throughout the transition into 3D and beyond. The one aspect I regret, if any, Is that I set out in my original brief to create quite a lot of 2D compositions as part of this projects concept period, however due to me taking on quite a lot of extra work and processes to make sure I have all of my characters to the point I am happy with them in 3D as well as all of the scene creation in engine, I wasn't able to fit that in. However this isn't really something that reflects badly ion the project, as even though this is over, I am planning on using the end result as a basis with with which to create some really nice portfolio pieces. 


RUST Final Major Project ~Wrapping Things Up...

With all the characters in and sorted, bar a few last minute adjustments and tweaking, I spent some more time cloning props to give the scene a more cosy feel with an enclosing circle of trees: This gives it a more, forest clearing feel I think, with a nice meeting point for the three main characters outside their home before they set off on their journey. I also threw more items about to make the environment more debris-strewn, to give you an idea of the sort of abandoned world that the robots inhabit amongst the natural backdrop. 


With the scene pretty much finished with a few exceptions, I went back into MAX to sort out my final renders and file setups for the presentation of my final characters. I polished up some of the characters animations as well, including adding a run cycle to the start of Sprockets usual walk cycle, which I think gives him a bit more depth to his movement with this added change of pace thrown in. I also created a little pedestal for each character (the model was the same throughout, I just changed the colour scheme for each character) for them to be displayed on, as well as a camera and light setup: Basically with the light, I added it to the circle shape and made it so that it moved to the frames on the animation. This essentially meant, that when set up in my render settings to the timeline, it would take a render at each key (a total of 240, which understandably took ages). This along with the really nice ambient lighting I added, would mean that I would be left with a load of JPEG'S  that would show off my characters at a complete 360 degree angle, WHILE they are walking along their walk-cycle. One of the final things I adjusted with Leo was to detach his loincloth mesh, and apply a cloth modifier to it, making it move along realistically as he went through his animations..... Though on a down note this meant that if he walked in a straight line he left it behind, in what can only be called a robot strip-tease. Time restrictions mean I cant try and fix this, but as this is only for the final MAX file It's not a massive issue, though unfortunate I couldn't carry across the fix into engine. 
Tweaking the materials of my characters is something that was an ongoing trial for me throughout this project, as I struggled getting the right levels for damage and rust as well as how it is applied to various areas on the robot's body surface. Through the application of noise  filters to areas of rust, I was able to give an effect of 'roughness' and 'peeling metal', as well as baking on ambient occlusion through the option in 3DSMAX, by rendering the shadows to each texture map then applying them to the diffuse on a lower opacity layer, it made each texture have a bit more depth even on a basic diffuse  layer underneath all of the additional maps. 
On top of the material adjustments, one of the final things that I wanted to achieve within my scene was to apply an animation tree to my characters within engine, so that they would be mobile, and walking about the scene. However, giving the last days to go, and things I still have left to do (such as documenting all of this ironically) on top of the amount of work it takes with applying animation trees, with varying animation sequences into Kismet... It's one of the few things that I just don't have time to do. It's a shame, but at least I have my Characters moving about in 3DSMAX, and in a well populated scene to finish which is more than I thought I would be able to manage during the final few weeks until project deadline. 

RUST Final Major Project ~Importing Into Engine

knew that bringing in my animated characters was going to be a bit of a steep learning curve, never having put characters into engine previously. First thing, the scale of Sprocket was way off.... probably should have set time aside for setting up the correct scale in Max first but never-mind, I made do by scaling him down once he was imported. Second thing I needed to sort out was applying his animations to him so at the very least he has a starting pose, instead of this stupid default t-pose. Took a few tutorials to see that I needed to export him with specific settings in FBX to get this to work... annoyingly, as I had been using CATRigs to animate my characters, the method of exporting was previously to utilize a plugin called UnrealX Actor, with which to bring across all of your animations, but is since outdated and replaced with FBX, which I struggled to find that many tutorials for. I persevered though, and managed to find a single tick box that made sure that all the bones attached to the skeletal mesh would carry over in their hierarchy system, although finding this out would take a few days of stressful research. 

The main problem with exporting characters was STEINTON! No matter how I setup all of my exports and made them match the other  characters UDK just refused to bring him into engine..... The problem I assumed was that this was down to his unique bone setup with his wheels attached as separate children to the rest of his mesh. After much aggravation during which I actually went back into MAX and tried to restructure all of Steinton's bone setup so that it was all attached, but to no avail.... yet again It was ONE TICK BOX in the UDK import options of skeletal meshes that would sort it out eventually (I swear if these sort of things were more clearly labelled and obvious then idiots like me wouldn't struggle so much with this crap). 
MORE research, and found out in order to get collisions and light information to interact with my characters (after numerous 'invalid shadows with skeletal mesh' warning messages after rendering lights), I needed to create a PhysicsAsset for each one and then apply it to my guys in scene. The process was pretty straight forward, with each bone with real world systems affecting it being represented by a box, I chose to use all of the bones within each mesh to be as accurate as possible (activating the simulation preview was a way to show how gravity affected how your character would fall over, which I didn't need to tweak at this time.... but was still hilarious to see how much Sprocket here flailed about like a failed body-popper :') )

Final Screen of characters in-scene: With physics assets applied to all characters and lightning built into my scene..... I was massively disappointed to find that ONLY ONE of my characters was affected by the spotlight I had placed in my scene to act as the glow from the fire.... despite me setting up each character exactly the same within engine, and also saving out each characters second UV channel correctly set up for light information.... No matter how much tweaking I did I just couldn't get the light to interact with Leo and Steinton as dynamically as it did with Sprocket, which was frustrating as these characters were affected by the world lighting fine. Hmmmm, I'll have to work more towards fixing this later, as I'm running out of time unfortunately. 

RUST Final Major Project ~Setting The Scene

With the characters finished, I turned my attention to engine work and setting up a scene for my Robots with a few props and scenery items. As I wanted to create a forest scene with my robots sat around a campfire, the first thing I made was a tree which I could copy all over my scene (though if i have time id like to make more than one to break things up a bit), using the usual method of extruding along splines and multiplying lots of alpha'd leaves. Before I made any other props, I setup this first tree as a static mesh with collision, and exported it as an ASCII file. I made sure I had all my materials set up first, especially the Alpha's around the leaves as I know the transition between Max and UDK can be awkward unless you set everything up correctly beforehand.


Starting in UDK, I decided on utilizing the terrain editor for the first time ever, as a way to create some interesting landscape instead of just a flat surface (as it's a natural environment). Following tutorials I was able to create a clearing over-shadowed by a cliff face, with a flattened area in the center for the character setup. Took me awhile to get used to the settings and controls of the terrain editor, as it was easy to get a bit carried away with the height creation of the mountainous areas I wanted to make. To make the terrain look more natural, i smoothed over the hard looking edges, and flattened other areas to make them more hard surface. 
Once I had finished shaping my terrain, I looked at applying a few basic materials to it, applying them in layers to get the desired  effect: Rock, Sand and Mud (grass), with mud resting on top and sand, and finally rock underneath, rock being most prevalent on the vertical areas, so that's where I painted it most heavily. i tweaked these maps several times until I was completely happy with them, as they wouldn't tile perfectly, but I left them after awhile as I didn't want to waste too much time on this aspect of the project. At this time I also began cloning my trees, populating my landscape with my forest setup. 

With a good amount of trees filling up my scene now, I looked towards creating teh rest of teh props for my level: A wall to the village that the robots reside in, a gate (in the shape of a giant gear), crates, girders, steel pipes, platforms, corrugated iron and steel drums. I tried not to spend too long creating these things, keeping their geometry simple, which is fine as that fits into the stylised fashion of my characters anyway. I positioned a lot of teh props around to create a sort of messy, shrapnel laden environment, as if the robots that dwell in their village constructed their home from bits and pieces that were found littered on the ground. 

All props in scene: I will mess around with positioning, and placing more to make it more busier, but I'm fairly happy with the amount of props I made to populate this scene. Obviously given more time I would make a wider variety, but I'll have to see how I go. Next step is bringing in my characters. 

Sunday 4 May 2014

RUST Final Major Project ~ Rigging and Animating Steinton

I knew even early on in planning out the 3D aspect of Steinton, that rigging him wasn't going to be easy and the main reason: He has wheels to move about instead of legs, and even though I had thought of several methods in my head to get it to work I knew that there were probably going to be issues with building a rig around his unique body type. I started with the upper half as this was the most straight forward, with standard anatomy with certain adjustments such as the addition of a jaw bone so i can animate his mouth to open and close (Though considering how i modeled the jaw part of his mesh as one solid shape i may need to tweak teh envelope weights to make it look more flexible... or his jaw will end up falling through his skull). 

I looked at adding various parts for some of teh trickier aspects of Steinton's mesh: I made the computer rig a spine bone, with the extra arm coming off it. The wheels I had the idea of making custom bones for using meshes that fit the shape of the wheels more..... as expected this didn't work at all, as the bones are all linked to teh spine, and so their pivot isn't individually local, but connected to the root point. 


Applied the Cat Rig to Steinton even though his wheels still weren't sorted to see how he moved without legs: actually looked better than I expected, I assumed without feet platforms with which to judge his movements on, he'd just flop about but it based it off his pelvis movement and so his upper half had natural movement regardless. I had to still tweak a lot of the values though on individual parts of his bones, as without making it more subtle Steinton rocked far too much and his upper half looked too unstable to remain on his wheels, especially his back half that is quite top heavy anyway, and so I made it rock, but in a less dramatic way to keep him looking like he is trundling as opposed to being on the verge of a barrel roll. 


I decided on making the wheels separate meshes to the rest of Steinton's body: This is so I could adjust their individual pivots (which you cant do for each element when its part of a single mesh), and rotate them all at the same time, as an animation that ran along at the same time as the walk cycle, the theory being that it would run alongside it acting all at the same time, looking seamless. This fell down however when I changed the walk cycle to walk in a line: on the spot it worked perfectly, but as soon as he moved forward Steinton would leave his wheels behind.... still rotating, but not following the rest of his rigged mesh.

After numerous tutorials and research, I found a method that would make the wheels follow the rest of the rig and mesh as one fluid movement. I basically had to manipulate the hierarchy setup so the separate wheels were attached to the rest as children, and so even though they were on their own animations and not attached directly, they moved along when the walk cycle was activated. Not only this, but as well as rotating on their own, they also rocked along with the rig, which was great in giving Steinton that uneven and unique movement to his animation. 

RUST Final Major Project ~ Texturing Steinton

Same as the previous two characters, began by putting down the base colours on the unwrapped diffuse map first, with an emphasis on old fashioned metal colours like bronze and copper this time round, to highlight the boring background of administration that Steinton was originally built for (and so hints at his original design remain regardless of his many modifications). In between the main body parts of copper and bronze colored steel, areas of black and silver break up the monotony, and as a focal point, all of the wiring and tubing that he uses to connect himself to his computer apparatus is full of a glowing purple energy that really stands out from his other neutral colours. As well as this their are several other areas on his face that also glow in contrasting bright tones, notably his eyes that have a blue aura and several orange nodes that are scatted all over him. I like to think these bright colours act as a sign of his eccentric personality against the rest of his bodywork.

Adding all of the dirt, grime and chipped paintwork helped give his bodywork more detail and character, adding slight rust spreading out from beneath certain panels as his metal texture and coloring wasn't the  same as the previous two characters and so only wanted to show minimal rusting on his bodywork, instead being more splattered with dirt and grime from all the inventive tinkering he gets up to. As well as this, began to mess around with specular and glossy combination maps, to get various parts of his head to stand out from one another. Alps looked at applying transparency as well as a vibrant glow to all of his 'lit' parts, such as his tubes and eyes, which i think gives it a more dynamic effect. Ideally, id like to make these areas maybe have a sort of movement, or throbbing sort of look to them? I'd have to look up the process involved to do so though, and maybe mess around with the ideas once i have Steinton in engine. 

Finished by applying relevant maps to the rest of Steinton's body: various areas needed a bit of tweaking, with values back and forth between teh specular and gloss maps so i got certain areas looking more realistic to their surface values... such as on the tire's, i obviously wanted the grip of the tire itself that stands off the main body of it to be less reflective, and so changed the gloss values of it on its map until i got it exactly how i wanted it. I decided on changing the lower part of Steinton's body color to a darker green/blue color, to add a bit more of a gradient to his body tones, which i think were lacking before. 

Final textured model: I'm fairly happy with how Steinton looks, though their are still some areas on his diffuse that i think still look a little flat, like on his rig behind his body.... i don't know, maybe its because i spent teh longest time working on Steinton out of teh other two, so I've spent a long time looking at him, but I'm finding it hard to put my finger on it. I'll try baking on his ambient occlusion onto his diffuse, like i did with Sprocket (and am going to do with Leo) to try and add soem depth to his textures. 

Thursday 1 May 2014

RUST Final Major Project ~ Modelling Steinton

Out of all of my characters, Steinton Probably has the most detail in his head, though bears many resemblances to the design of Sprocket (Hinged jaw, large eyes, etc). Because of the amount of detail around his mouth as it just allowed me to trace out the jagged 'teeth' that are around the lip of his jaw, and that contribute to his cranky appearance. In opposition to the other two characters anatomical style (Sprocket: Based off regular human anatomy. Leo: Over sized and hulking upper body), Steinton has a more diminutive body style but with a larger designed head, to show off his character as an 'eccentric genius' archetype.  This made getting the scale of both his head and body to look right tricky, as I didn't want to stray too far from the exaggerated look I was going for. 

The body itself has a curved look, as the top half doesn't connect to a bottom half in the same way normal anatomy does on account of him being connected to all of his computerized machinery: The middle 'rubber insulation' that covers all of the wires and electronics in his stomach area bend back towards where he is attached to his computer rig. The idea I had that as he is heavily modified his original design back when he was available as an administrative droid, would that he's be attached to a reception or some sort of terminal by this socket. In the many years since his modifications though, he has added his own enhancements and wheels so he can move about on his own. 
The arms are very similar in design to those i made for Sprocket, with the same sort of Armour at the forearms and exposed pistons elsewhere. The main difference however is that his limbs are more streamlined and flow to a point, with needle-like fingers. Bar a few exceptions, the two arms are largely identical and so will just instance them over by using the symmetry modifier, then add any necessary differences after. 


Wheel's were as straight-forward as you'd expect, though I left the tire's separate as I'm not sure which part of the wheels I'm going to animate later during the rigging process. I just focused on the exposed part of his lower half, as the bottom half isn't visible, though I'll probably add some wires and other machinery later on. 


The back end of Steinton's rig is probably the most detailed part, and even though his body is the most important part you see, I still wanted the attention to detail to be as high on the rest of him. It was a lot more work than the previous two characters, as where they would end at the legs Steinton had a lot more complex setup with his rig, with wheels and an extra arm attached.  I created the third arm from scratch as it was more minimal than the previous two, but still bared similar attributes, which is why i carried over the fingers (which also saved a lot of time). 

For the final details for the mesh I added all of the wires and tubes that connected from Steinton's upper body to the rest of his computer rig. I made sure that the large tubes that connected his body to the computer, that kept the mysterious energizing coolant that helped power his high powered RAM in his body, had lots of edge loops in them as I was taking into account that these would need to move about a lot once Steinton is rigged and animated. There was also lots of wiring and tubes within the rear of the open section of his body, that took quite a while to add all of the detail too, even though each one was low poly, I wanted to give an insight into the internal workings of his mechanics by showing this amount of detail. 


Final Mesh for Steinton: Probably took the longest to create out of all of my characters, Steinton is the one I'm most proudest of at this point in that despite the tricky nature of his design, I was able to translate it over into 3D successfully, with the amount of attention to detail he has I was worried I may have had to compromise if a part may not have made the transition but I'm happy that was not the case. 

RUST Final Major Project ~ Props, Rigging and Animating Leo

With props now on the agenda next, Looked at creating his basic mask that Leo would wear over his 'head'.  Decided on basing this initial mask (as I'm hoping to make alternate ones with varying expressions for him later, and if i have time) off one of his early sketches, as I really like the expression and the idea of it being made out of crumpled up old cardboard.... The innocent nature of this hulking war droid putting together a new face out of something so flimsy I think reflects his child like personality perfectly. 
Another Prop I decided to make for Leo was a cuddly toy to again highlight his softer personality. I like the idea of him having a little friend perched on his shoulder as he travels along, and as my original concept of having a small child being looked after by my robots as part of the story was scrapped, I've wanted to replace the idea of having something riding on his large shoulder with something else, so this helps keep that original idea. 


And here is Leo with the final textured props. Like with the rest of him, I made them grimy to show wear and tear and to highlight that they were salvaged from a world that has long since vanished or moved on. I liked the idea of him having holes in his mask for his visual sensors to pop through, so it doesn't obscure any of his   sight. Also putting the military helmet on his Bunny stuffed toy I thought was a fun way to show a clue to his military background.

Again using a CATRIG setup for Leo's rigging, I made one from scratch to adapt it to his unique body type. Initially there were some odd glitches preventing me from manipulating the scale of each bone, but after restarting Max which seemed to resolve it I was able to move on. This rig needed a few extra bones adding to it as well as the  regular anatomy, for things like the shoulder cannon and the stuffed toy on his shoulder, as these elements I want to wobble and bounce about as he moves. 


Working from the basic CATMotion walk cycle, I tweaked each individual aspect of his movement to give him a movement that I think suited his character best. I I tried to make his stride shorter and slower to make him more looming and clumsy looking, and his arms have a more exaggerated swing to highlight their large size. 
Also, i had to limit his head movements as I had to take into account its not exactly a head in the  traditional sense as a sensor array attached to the forward part of his chest, and so only slight movement (to make his mask seem animated more than anything) was necessary here. Also, away from the walk cycle itself, I used keyframes on the timeline to move both his cannon and stuffed toy about on his shoulders, so that they bobbed about along with his walk.


Below, Final render of Leo, Fully rigged and posed: Through trial and error with my first character, Sprocket, I think that I have been able to not only work faster and smoother but also that the end results of my second character have worked out better than i expected. I liked the opportunity to animate other parts of the character that weren't directly part of the CAT Rig as I think the end result is something more dynamic and believable with various elements on the character moving about at the same time. 

Monday 28 April 2014

RUST Final Major Project ~ Texturing Leo

Like with Sprocket, I just textured onto Leo  base colours to start with, working from my original artwork. Because his head isn't highly detailed and low in detail, I chose various other parts of Leo structure to add to his head map and so to make the most of the space available in the separate head and body map setups (The area around his 'head' and his shoulder cannon would be the parts utilizing the head map). Leo's colour palette   makes more use of breaking up the varying areas of Leo's body then Sprockets initially did, with opposing limbs bearing different tones. 

Once the base colours were laid down, I then worked on applying the surface detail, showing off the paneling and vents, etc as well as any text/labeling printed onto his bodywork. As well as this, I layered on top of it all of the wear and tear, dirt and rust to show the worn nature of his surface. As the main body of Leo is painted, I made sure to make the  edges worn off and scuffed to show the  metallic body underneath, with lots of scratches and patches of rust affecting exposed metal plates. 

Working with the specular maps on Sprocket and the help I got with how to approach creating them on hard surfaces like the metal plates, gave me a better insight when creating them for my second character. Initially the specular's once applied were too overbearing, but once I subtracted the areas that were worn (such as the rust, and dirt) from the white areas it only applied the specular to the areas that needed it. On top of this, with the application of a Gloss map also it broke up the surface properties between the paint job, the metallic surfaces and the markings on his bodywork. 


Below, The finished textured model of Leo: Applied Diffuse, Specular, Glossy, Glow and normal maps, and tweaked and adjusted the levels for the final result. Learning from problems I encountered with the texturing process with my first character Sprocket, helped make the process a lot more straightforward with Leo, with a better knowledge of the interaction between Specular and Glossy maps, which i think has contributed towards making Leo look as polished as he does in the final render. I also like how some of the smaller details on Leo have turned out, such as the 4 stars on his left shoulder joint, to show off his past military rank as a general.